REPAIR CENTER
Repair Center
Click Here

OSHA names falling from heights as one of the most common causes of workplace injury and fatalities. Given the increased amount of cell tower, HVAC, solar panel, and general maintenance work taking place rooftops, it is both vital and mandatory that proper fall protection is provided. This is why rooftop safety guard rails are so important.
In this guide, we will identify rooftop fall hazards that require fall protection guard rails. We will explain how the portable and non-penetrating Safety Rail 2000 guard rail system is the perfect solution. We will show the best practices to properly configure a Safety Rail 2000 system. And finally, we will explain how to correctly install this system.
Based on the relevant OSHA standards 1910.28 and 1910.29 and their roof guardrail requirements, we've identified at least 4 areas of major concern for rooftop safety that would require a safety rail for roof system.
It is important to keep in mind that if a rooftop is as little as 4 feet above another structure, a guardrail may be required (OSHA 1910.28(b)(1)(I). This means that even elevated platforms on a rooftop may require guardrails.

Surprisingly, many falls happen when accessing or exiting a rooftop. A common access point that requires guardrail fall protection is a ladder system.
It is also not uncommon that door or stair access points require guardrail fall protection.
Guardrails are required in such cases because the access point is at the edge of the roof (in the case of a ladder) and/or it is less than six feet from the edge of the roof (in the case of stairs or a door). An integrated gate system may also be required.

Once rooftop access is safely made, the immediate area of concern is the rooftop edge. It is crucial that rooftop edges are properly protected if workers are less than six feet form the the rooftop edge (OSHA 1910.28(b)(13)(ii).
Importantly, even if the roof has a parapet wall, that may not be enough to provide proper protection. Most parapet walls are not tall enough to meet fall protection requirements.

Obviously, the main reason a worker is on a rooftop to begin with is to maintain and repair equipment. Common examples of such equipment are HVAC units, solar panels, and cell towers.
If any such equipment is located less than six feet from the rooftop edge, fall protection is required. Given the limitations of anchorage points on rooftops. Guardrails often provide the best method of fall protection.

An often overlooked fall protection hazard on rooftops is rooftop hatches or skylights. Workers must be protected from falling through rooftop hatches or skylights. Hatches should not be left freestanding without barriers around them.
Multiple technologies exist to secure these fall hazards. Guardrail systems (with optional gates) can be an ideal method to secure these rooftop features.

The ideal solution to these four rooftop safety hazards is the Safety Rail 2000 fall protection guard rail system.
Safety Rail 2000 is a fully customizable portable and non-penetrating guard rail system. Safety Rail 2000 kits are available in a variety of rail lengths. Each kit comes with one rail, one base, and the necessary locking pins.
Safety Rail 2000 is also available in a variety of color finishes, yellow being the standard, and is available in galvanized. Gate kits are available to provide the needed protection to rooftop access points.
This system provides solutions for most of the areas of concern on a rooftop. But what about ladder entry points on a rooftop?
Safety Rail 2000 is also provides special fall protection safety rails just for ladder entry points on rooftops. These are called Finish Rail kits. Finish Rail kit’s rails extend out further than the regular kits.
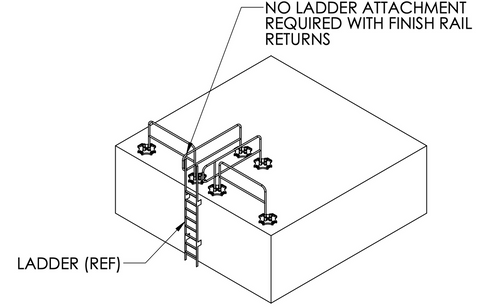
The simplest way to provide the proper fall protection for roof top ladder entry points is to use two regular safety rail kits and two finish rail kits (two extra bases will also be required).
The two finish rail kits are placed perpendicular to the ladder access and exit point. Two normal rail kits are then placed parallel with the roof line and are attached to the two finish rail kits. That's it. Problem solved.
Because the rail on a finish rail kit extends a little further out, it closes any gaps between the ladder and the roof edge.
A common area of misunderstanding for many trying to install OSHA recommended fall protection guard rails on rooftops is simply this: what length rail kits do I need and how many? This is fairly simple to figure out. But, please note that large or complicated jobs should submit drawings to us so an engineer can assist.
First, one has to determine the layout of the rooftop guard rail system. Will it be an closed layout design that connects back onto itself like a square or rectangle or something similar? Or will it be a design that does not connect back on itself, like a straight run—an open layout?
Let's use an example layout of a 20' x 40' rectangle to demonstrate how the correct number of kits is obtained.
(1) First, we need to account for the distance between each rail when a kit is installed. This distance is 1/2 foot.
(2) Second, we add this 1/2 foot to the longest rail kit available which is the 10' rail kit. This gives us 10.5. We use the longest rail kit available in order to use the fewest rail kits and bases possible. This saves money. Note: in California the longest rail length that can be used is 7.5'.
(3) Third, we then divide the lengths of each of the sides of the closed layout configuration - our 20' x 40' example - by this 10.5 number. So 20 divided by 10.5 gives us 1.9 for the 20' sides and 40 divided by 10.5 gives us 3.8 for the 40' sides.
(4) The number on the left side of the decimal point is the number of 10' kits needed. The "1" in our 1.9 number for our 20' sides means that we need 1 each 10' rail kit per side - for a total of 2 each 10' rail kits (there are two 20' sides).
The "3" in our 3.8 number for our 40' sides means that we need 3 each 10' rail kits per side - for a total of 6 each 10' rail kits (there are two 40' sides).
The number on the right of the decimal point is the length not to be exceeded by the final kit needed. So the ".9" in our 1.9 tells us we need a 9' rail kit. That doesn't exist. So we go with the nearest kit to that number which is a 8' rail kit. This means we need 2 each 8' rails kits for our 20' sides - 1 for each side.
And same goes for the ".8" in our 3.8 number. It again tells us we need 2 each 8' rail kits for our 40' sides - 1 for each side.
So the kits needed for our 20' x 40' rectangle are: 8 each 10' rail kits and 4 each 8' kits.
The number and length of kits needed for open layouts is figured out in the same way, but with one important adjustment we will explain shortly.
So let's say you have a 85' straight(ish) run. We do our calculations and our 85 divided by 10.5 gives us 8.09.
This means we need 8 each 10' kits. That’s it. The “0.09” is insignificant—about 9 inches. In other words, the run will come in just under 85’ long.
If you have to cover all of the 85’ and have room, you can add a 3’ kit and get the coverage distance out to about 88’.
But we are not done. Because this is an open layout (it does not connect back to itself), returns will be needed at each end. Returns are required to stabilize the safety rail in an open layout design.
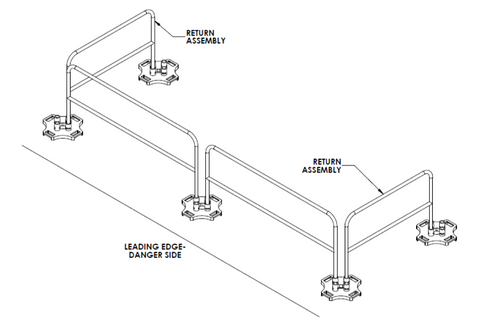
In the above picture, returns are labeled as such. You can see that they are simply additional kits that come off at a 90 degree angle from the first and last rail of the run.
So, unless the open layout is an “L” design, then two additional kits will be needed to act as returns. The rail kits used for returns are generally the 5' kits.
Finally, because this is an open layout, one extra base will be needed to terminate the run. Why? Well, only one base and one rail comes with each kit. But you can see in the picture that five bases are needed.
To recap then, the need for returns means that for a 85' run we need 8 each 10' kits and 2 each 5' kits (the returns), and 1 extra base to terminate the entire run. Simple.
Installing the Safety Rail 2000 guard rail system onto your roof surface is a pretty simple process. Because it is a non-penetrating guard rail and portable, very little prep, if any, is required. All that is needed is a flat surface.
Installation is simply a matter of placing the bases, inserting the rails, and installing the locking pins. The system can be moved or adjusted at any time. And once installed, the system can be left in place.
Because the bases weigh over 100 pounds, it might be helpful to use a Safety Rail 2000 EZ Mover to wheel the bases around once on the rooftop. The EZ Mover makes moving and setting the bases in place a far easier task.
As usual, if you have any questions do not hesitate to reach out to us. We've been at this a long time and are a useful resource for you. Click Here to learn why we are the go to company for all your fall protection guard rail needs.